Introduction
The success of a metal forming tool depends on optimizing all the factors affecting its performance. Usually, operating conditions (applied loads, abrasive environments, impacts, and other factors) determine how well a tool holds up. Most tool failures are related to such mechanical causes. However, with a variety of tool steels available for manufacturing metal forming tools, it is often possible to choose a tool steel with a favorable combination of properties for particular applications. By comparing the levels of metallurgical properties offered by different steels, tool users can determine which tool steels are best suited for fixing or resisting performance problems, or for enhancing tool performance. Tool steels can be categorized and compared by those properties which have a direct influence on tool performance: hardness, toughness (impact resistance), and wear resistance.
• General purpose
&n— O1, A2, D2
• Improved toughness (impact resistance)
&n— S7, A9
• Improved wear resistance
&n— CruWear, M2
• High performance CPM
&n— 3V, M4, 9V, 10V, T15, 15V
Historically, tool steels used for stamping and forming tools have included A2 and D2, with occasional use of the high speed steel M2. A2 and D2 are familiar to most tool builders and tool users as common, general purpose cold work tool steels. They combine good all-around performance properties for stamping and forming with low cost, wide availability, and relatively easy fabrication. However, they sometimes do not provide the level of performance needed for high volume production. Specifically, where long runs and infrequent regrinding are desired, other higher alloy tool steels or carbide might be used to upgrade from these tool steels. Traditionally, other properties, such as impact resistance, may be sacrificed in order to gain the higher wear properties. Conversely, steels chosen for their resistance to impact or breakage may not be capable of high wear resistance. An understanding of these tool steel properties and related issues permits selection of the optimum steel for most applications.
Before discussing specific grades, it will be useful to discuss generally the properties of tool materials. The primary properties important to cold work tools are hardness, toughness, and wear resistance. Each of these properties may be varied independently in tool steels to some extent, so it makes sense to consider each separately. In fact, the same properties would be important to consider in carbide materials as well as steels. An understanding of these properties, combined with an understanding of what factors limit tool life for a particular tool (breakage, wear, deformation, etc.), will allow tool users to specify the best performing grade for nearly any application. Tool users can examine failed tools to determine which property may have been lacking in a tool, or which properties should be improved, and what other properties must be considered in alternate materials with the required improved properties.
• Hardness
&n— resistance to deforming & flattening
• Toughness
&n— resistance to breakage & chipping
• Wear resistance
&n— resistance to abrasion & erosion
Properties of Tool Steels — Hardness
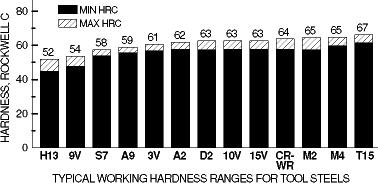
Hardness is a measure of a steel’s resistance to deformation. Hardness in tool steels is most commonly measured using the Rockwell C test. Hardened cold work tool steels are generally about 58/64 HRC (hardness Rockwell C), depending on the grade. Most are typically about 60/62 HRC, although some are occasionally used up to about 66 HRC.
Hardness vs Compressive Yield Strength
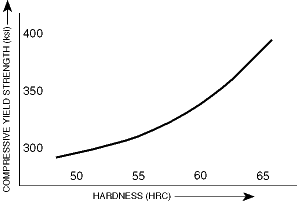
Hardness testers work by using a standardized load to make an indentation in the test piece, then measuring the size of the indentation. A large indentation indicates low hardness (material is easily indented). A small indentation indicates high hardness (material resists being indented). Thus, the material’s resistance to deforming (compression, indentation) is indicated directly by its hardness. When different steels measure at similar hardnesses, it is because the hardness tester made the same size impression in each. Thus, at the same hardness, different steels have similar resistance to deformation. The hardness test is basically independent of the grade of steel tested.
Tools which plastically deform in service possess insufficient hardness. Permanent bending of cutting edges, mushrooming of punch faces, or indenting of die surfaces (peening) all indicate insufficient hardness. Because a steel’s resistance to indentation is directly related to the hardness, not the grade, corrective actions for deformation may include increasing hardness, or decreasing operating loads. Changing grades will not help a deformation problem, unless the new grade is capable of higher hardness.
Choosing for Hardness
Small differences in hardness do not usually have a significant effect on the wear life of tool steels. Different tool steels are used at similar hardnesses, yet offer significant differences in expected wear life. Thus, hardness is not usually a primary factor in wear resistance, only in deformation resistance. The wear resistance of tool steels is more directly affected by their chemical composition (grade) as discussed below.
Properties of Tool Steels — Toughness
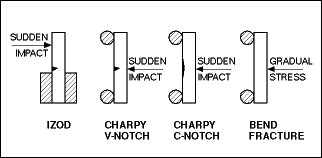
Toughness, as considered for tooling materials, is the relative resistance of a material to breakage, chipping, or cracking under impact or stress. Toughness may be thought of as the opposite of brittleness. Toughness testing is not as standardized as hardness testing. It may be difficult to correlate the results of different test methods. Common toughness tests include various impact tests and bend fracture tests.
In impact testing, a small sample is held in a fixture and fractured by a moving impacter, such as a calibrated weight on a pendulum. Toughness is reported as the amount of energy, usually measured in foot-pounds or joules, that the sample absorbs before it breaks. Brittle materials will absorb little energy before fracturing. In bend fracture testing, a fixtured sample is subjected to gradually increasing amounts of pressure, usually side or bending pressure, until it breaks.
Methods of Toughness Testing
Most tool steels are notch-sensitive, meaning that any small notch present in the sample will permit it to fracture at a much lower energy. Solid carbide is even more notch-sensitive than tool steels. Thus, in addition to inherent material properties, the impact resistance of tool components is significantly impaired by notches, undercuts, geometry changes, and other common features of tools and dies.
In service, wear failures are usually preferable to toughness failures (breakage). Breakage failures can be unpredictable, catastrophic, interruptive to production, and perhaps even a safety concern. Conversely, wear failures are usually gradual, and can be anticipated and planned for. Toughness failures may be the result of inadequate material toughness, or a number of other factors, including heat treatment, fabrication (EDM), or a multitude of operating conditions (alignment, feed, etc.) Toughness data is useful to predict which steels may be more or less prone to chipping or breakage than other steels, but toughness data cannot predict the performance life of tools.
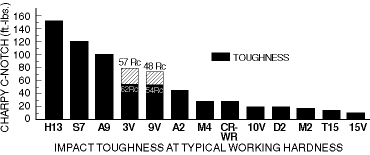
Choosing for Impact Toughness
Properties of Tool Steels — Wear Resistance
Wear resistance is the ability of material to resist being abraded or eroded by contact with work material, other tools, or outside influences (scale, grit, etc.) Wear resistance is provided by both the hardness level and the chemistry of the tool. Wear tests are quite specific to the circumstances creating the wear and the application of the tool. Most wear tests involve creating a moving contact between the surface of a sample and some destructive medium. There are 2 basic types of wear damage in tools, abrasive and adhesive. Wear involving erosion or rounding of edges, as from scale or oxide, is called abrasive wear. Abrasive wear does not require high pressures. Abrasive wear testing may involve sand, sandpaper, or various slurries or powders. Wear from intimate contact between two relatively smooth surfaces, such as steel on steel, carbide on steel, etc., is called adhesive wear. Adhesive wear may involve actual tearing of the material at points of high pressure contact due to friction.
We often intuitively expect that a harder tool will resist wear better than a softer tool. However, different grades, used at the same hardness, provide varying wear resistance. For instance, O1, A2, D2, and M2 would be expected to show increasingly longer wear performance, even if all were used at 60 HRC. In fact, in some situations, lower hardness, high alloy grades may outwear higher hardness, lower alloy grades. Thus, factors other than hardness must contribute to wear properties.
Hardness of Carbides
Alloy elements (Cr, V, W, Mo) form hard carbide particles in tool steel microstructures.
The amount and type present influence the wear resistance.
• HARDENED STEEL
• 60/65 HRC
• CHROMIUM CARBIDES
• 66/68 HRC
• MOLYBDENUM CARBIDES
• 72/77 HRC
• TUNGSTEN CARBIDES
• 72/77 HRC
• VANADIUM CARBIDES
• 82/84 HRC
Tool steels contain the element carbon, in levels from about 0.5% up to over 2%. The minimum level of about 0.5% is required to allow the steels to harden to the 60 HRC level during heat treating. The excess carbon above 0.5% plays little role in the hardening of the steels. Instead, it is intended to combine with other elements in the steel to form hard particles called carbides. Tool steels contain elements such as chromium, molybdenum, tungsten, and vanadium. These elements combine with the excess carbon to form chromium carbides, tungsten carbides, vanadium carbides, etc. These carbide particles are microscopic in size, and constitute from less than 5% to over 20% of the total volume of the microstructure of the steel. The actual hardness of individual carbide particles depends on their chemical composition. Chromium carbides are about 65/70 HRC, molybdenum and tungsten carbides are about 75 HRC, and vanadium carbides are 80/85 HRC.
These embedded carbide particles function like the cobblestones in a cobblestone street. They are harder than the steel matrix around them, and can help prevent the matrix from being worn away in service. The amount and type of carbide present in a particular grade of steel is largely responsible for differences in wear resistance. At similar hardnesses, steels with greater amounts of carbides or carbides of a higher hardness, will show better resistance to wear. This factor accounts for differences in wear resistance among, say, O1, A2, D2, and M4. Ideally, tool steels would contain as much carbide volume as needed for the desired wear performance. In fact “solid carbide” tooling is typically 85% or 90% tungsten carbide particles, in a matrix of 10% or 15% cobalt to hold them together. Chemically, the microscopic carbide particles in tool steels are similar to the carbide particles in solid carbide tools. However, very high amounts of carbide particles can lead to problems in grinding, or lower toughness. More comments on the effect of carbides on toughness and grindability are discussed in the following section: Effect of Steel Manufacturing on Properties.
Because of their high hardness, vanadium carbides are particularly beneficial for wear resistance. When present in significant amounts, vanadium carbides tend to dominate other types in affecting wear properties. For instance, M4 high speed steel’s chemical content is nearly identical to M2 high speed steel, except M4 contains 4% vanadium instead of 2%. Despite the high levels of molybdenum and tungsten carbides (about 6% tungsten, 5% molybdenum) in each grade, the small difference in vanadium content gives M4 nearly twice the wear life of M2 in many environments. In cold work tool steels, the carbide content in general, and to a limited extent the vanadium content in particular, may sometimes be used as a rough predictor of potential wear life.
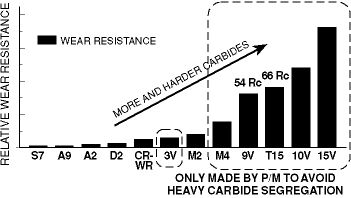
Effect of Carbide Content (esp. VC)
on Wear Resistance
HRC 58-62 except as noted
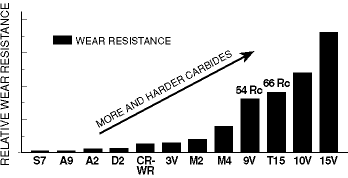
Steels with high volumes of carbide particles, or high hardness types of particles, usually exhibit the best wear resistance. Vanadium carbides, because of their hardness and chemistry, are the most effective at enhancing wear properties; chromium carbides are among the least effective.
Effect of Steel Manufacturing on Properties
The maximum practical limit to the amount of carbide-forming elements which may be added to a steel for wear properties depends on the ability to maintain a reasonable distribution of those carbides throughout the steel’s microstructure. When steels are manufactured, they are melted in large batches, containing the desired chemical composition. The batches are poured into ingot molds, and solidify into castings which are subsequently forged or rolled into bars. During the solidification process, the carbides are formed. Under conditions of long slow solidification, these carbides form interconnected “segregated” networks, because they do not stay dissolved in the liquid steel. Large amounts of carbide particles result in more segregation, and thus more non-uniformity in the steel microstructure.
Carbide Size and Distribution
The alloying elements Cr, V, W, and Mo form hard carbide particles in tool steel microstructures. The amount and type of carbides influence wear resistance. Carbides are intended to improve wear resistance, but their non-uniform size and distribution (i.e., segregated networks) can impair toughness and grindability. Grades containing a high volume of hard carbides, like high speed steels and high vanadium cold work grades, may be particularly affected.
This carbide segregation causes two basic problems. First, areas of high concentrations of hard carbide particles may be difficult to grind, resulting in fabrication difficulties. Second, when these segregated areas are physically elongated during rolling or forging, they result in a directionally oriented microstructure, and reduce the material toughness along the transverse direction. Vanadium levels over about 3% are high enough to cause particular grinding and toughness difficulties. For this reason, despite its benefits for wear resistance, vanadium is usually limited to about 2-1/2% max. in conventionally manufactured tool steels.
The CPM Process
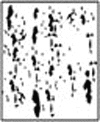
In order to manufacture tool steels with high wear resistance, without encountering these serious drawbacks, powder metallurgy processes are used to produce P/M tool steels having high vanadium content. Molten tool steel is atomized into fine droplets which solidify from the liquid so rapidly that the carbides are prevented from forming into large segregated networks. The solidified droplets form powder, which is then loaded into a steel can and consolidated (the individual powder particles are bonded together under high pressure), and subsequently forged or rolled into steel bars. The carbides formed during the extremely rapid solidification are fine in size (2 to 4 microns), and are uniformly distributed throughout the microstructure. Compare this to the larger carbides (up to 50 microns or more in size), and the characteristic alloy segregation or banding which results from conventional steelmaking methods. The characteristic feature of P/M tool steels is their near complete freedom from carbide segregation.
Microstructure (Carbides)

CONVENTIONAL CPM
For grades with a high volume of carbides
(high wear resistance)
Effect of Carbide Content (ESP. VC)
on Wear Resistance
HRC 58-62 except as noted
Because the microstructural distribution of carbides in P/M steels is so fine and uniform, higher amounts of carbide-forming elements may be added. Thus, higher wear resistance may be developed, without the toughness and grindability limitations inherent in conventional steelmaking. The P/M process has allowed the development of grades containing 4%, 5%, 10%, and even 15% vanadium, offering far greater wear resistance than conventionally produced tool steels. Because of their high wear resistance, these high vanadium P/M grades are particularly suitable for high production operations.
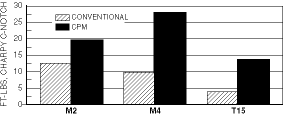
In addition, the uniformity of the CPM microstructure provides improved toughness in CPM versions of conventional tool steels. The CPM versions of the same grades are more resistant to brittle failures. In fact, most CPM grades designed for metalforming tools have impact resistance comparable to the lower wear resistance grades such as D2. Thus, CPM steels may offer simultaneous improvements in both wear and toughness compared to conventional tool steels.
Toughness, CPM vs Conventional
Heat Treating Benefits of High Alloy Tool Steels
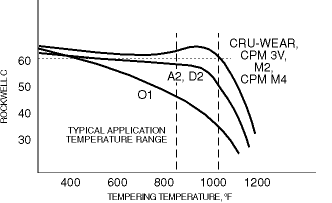
The heat treating process used to harden steels consists of heating them up to a high temperature (usually 1700/2200°F), then quenching to near room temperature, and finally reheating to some intermediate temperature for tempering (300/1100°F). A characteristic of low to medium alloy steels (A2, O1, D2) is that they soften from their maximum hardness somewhat during tempering. The amount of softening depends on the temperature exposure and the individual grade characteristics. To retain maximum hardness (over about 58 HRC), A2 and D2 are usually tempered around 400/500°F. Higher exposures result in lower hardness. A side benefit of high alloy content, typical of high speed steels, and most of the high wear resistance CPM steels, is that the tempering characteristics are changed because of the alloy content. They are tempered over 1000 F, yet retain their full hardness during this exposure.
Coatings and Surface Treatments
Beneficial surface treatments, including nitriding, titanium nitride coating, etc., are often applied to tool steels to permit lower friction, better wear resistance, or other properties. Most of these coatings are applied at temperatures of about 850/1050F. Thus, the treatment process can limit the service hardness of low or medium alloy steels. However, the higher alloy content steels such as M2, M4 as well as CPM 3V, 9V, 10V, 15V retain their maximum hardness after such exposures. Thus, normal surface treatment temperatures have no effect on their hardness, and tools may be treated without fear of dimensional or hardness changes. The additional wear protection of a surface treatment may be added, without sacrificing deformation resistance. The CPM grades provide excellent substrates for all types of surface treatments.
Choosing Tool Steels Based on Properties
As mentioned above, A2 and D2 are common steels used for metal forming tools. More highly alloyed grades offer better wear resistance. When choosing the tool steel for any tool, the required properties for the application should be considered. What is the workpiece? What is the historical failure mode for current or similar tooling? Which properties should be increased? What trade-offs may be required?
For tools requiring high resistance to plastic deformation, hardness should be a concern. Tools for stamping steel generally need to be about 56/58 HRC minimum, although some form tools, and tools for non-ferrous work material, may be softer. Most tool steels are capable of reaching roughly similar hardness levels (low 60’s HRC), and thus will have similar abilities to resist plastic deformation. However, some high speed steels, such as CPM Rex T15 and Rex 76, can achieve hardnesses approaching 70 Rockwell C. Keep in mind that in tool steels, the major mechanism controlling wear properties is the type and amount of carbide particles present. For this reason, increasing the hardness is not generally an effective method for increasing the wear life of tools, but only for minimizing deformation.
For better deformation resistance than A2 or D2 tools (60/62 HRC)
• GOOD
&n— M2, Cru Wear - (62/63 HRC)
• BETTER
&n— CPM M4 - (63/64 HRC)
• BEST
&n— CPM T15 - (64/66 HRC)
&n— CPM Rex 76 - (64/67 HRC)
For tools needing high resistance to chipping or breakage, for instance where frail geometries or thin projections or sharp notches are a problem, high impact toughness is required. In general, tool steels, even those with low impact toughness, are many times tougher than solid carbide. (The toughness of carbide materials is often measured in inch-pounds, where tool steels are measured in foot-pounds.) Within the families of tool steels, there is some variation in impact resistance. Shock-resisting steels, like S7 and A9, are both designed to offer optimum resistance to breakage. However, they differ in their heat treating process. S7 cannot generally be coated for improved surface wear properties, because of its low tempering temperature. A9 is typically tempered at over 900 F, and thus may be coated by any of the common commercial coating processes. The maximum hardness of both grades is approximately 58/59 HRC. In examining alternatives to carbide tools, where chipping is the normal failure mode, the toughness comparisons among steels are usually moot. In these cases, the normal recommendation is to use CPM 10V or 15V instead of carbide in most applications, or Rex T15, Rex 76 or Rex 121 when high hardness is needed. These grades provide the closest wear and hardness properties to carbide, while offering the toughness properties of tool steels.
There are several other factors beside inherent material properties which often contribute to chipping or breakage failures. Tool steels are notch-sensitive materials. The presence of notches, undercuts, sharp radii, changes in section, or any geometric features may concentrate applied stress and exaggerate the material’s tendency to break. All reasonable precautions to avoid unnecessarily sharp radii should be exercised. In addition, in heat treated and EDM’d tools, the EDM operation can leave the surface in a condition prone to chipping. Where EDM’d tools are experiencing chronic chipping or breaking problems, they should be stress relieved (tempered) after EDM before going into operation, and if practical the EDM layer should be removed as well (stoned, polished, etc.).
For better impact toughness than D2 tools (20 ft-lbs)
• GOOD
&n— A2 - 45 ft-lbs
• BETTER
&n— CPM 3V - 55/80 ft-lbs
&n— CPM 9V (if lower hardness OK) - 50/70 ft-lbs
• BEST
&n— A9 (coated or nitrided for wear) - 80/100 ft-lbs
&n— S7 ( low wear resistance) - 100/125 ft-lbs
Hardness and toughness may be considered “step” or “threshold” functions; that is, as long as the property is high enough to prevent damage (indentation or breakage), there is no further advantage to increasing the property even higher. However, wear resistance may be considered a “continuous” function; that is, continual increases in the wear resistance of the steel will result in increases in the life of the tool. Thus, upgrading for wear resistance may always offer benefits, provided other properties are not compromised. When long-term abrasive wear resistance is desired in a tool (that is, when the basic tool runs well, but a longer in-service time is desired), a steel with higher wear properties is appropriate. In this case, nearly all the choices for upgrading will involve steel of higher alloy content. Several of the high-alloy CPM steels offer wear properties midway between conventional tool steels, and carbide. In working with abrasive media, the CPM steels offer very high resistance to wear. However, in situations generating severe metal-to-metal wear (adhesive wear, or galling), the best solution is to separate the two metal surfaces. This may involve a lubricant, or commonly a non-metallic coating (titanium nitride, titanium carbonitride, or other related ceramic coatings). These coatings reduce the coefficient of friction between the workpiece and the tool, and reduce the risk of welding or galling wear. When coatings are not practical, materials offering a combination of high toughness, high hardness, and resistance to abrasion, such as CPM 3V or CPM M4, are suggested.
For better wear resistance than D2 tools
• GOOD
&n— CruWear, M2, CPM 3V (2-3% V)
• BETTER
&n— CPM M4, T15 (4-5% V)
• BEST
&n— CPM 10V, 15V (max V)
